Monday, February 23, 2009

Post crops photos

Two of my boards (AMR and Serendipity) had online crops this weekend, and Scrap Attack is full swing into the {SAS}sy Member Fun Month - makes for a LOT of challenges! I didn't get as many done as I would have liked, since we went to the toy show on Saturday, but that's ok. The SAS crop is going on for a whole month, so I will have plenty of time to work on those challenges. {Once I get my word and name atcs done!}

Here is my desk after the crop - I cleaned up after every project this time, which made it a lot easier to get the desk cleaned afterwards. The only thing I added since the first photo is the bow near the top of the photo (left over from the roses my DH gave me for Valentine's Day) and a Cropper Hopper insert that is holding the papers and big scraps from the crop projects.

These are the five layouts I got done this weekend, plus one of the cards (tucked on the lowest shelf of the new shelf unit). Pretty good for me. That brings me up to 9 for the month, and 3 cards. So in order to meet my February goal, I need to do 1 more layout, 2 more cards, and finish up the minialbum.

This is the other card I made- done for Kelli's tropical greetings challenge. I love that stamp - the stick people are too cute. The tree was done in several layers - I stamped it on the green for the leaves. Pink adhesive cardstock (DCWV) for the swim suit, and a piece of sandy colored cardstock for the base. I used a masking technique to that only the girl and the tree trunk were stamped on the base. The leaves were inked, curled, and put on with pop dots to add dimension. The tree trunk, hair and sunglasses were colored with colored pencils. The patterned paper came from the DCWV summer stack, and has surfboards on it - love the colors, but wish I had done the card so you could still see the surfboards.


I'll post the layouts separately at another time, especially the two I used Clear Scraps acrylic on.

Sunday, February 22, 2009

The Oscars

Been busy working on layouts for challenges and the DT, but I wanted to mention that Heath Ledger won the Oscar for Best Supporting Actor tonight, for his role as the Joker in The Dark Knight.
I was not a big fan about this role. I couldn't see Heath, of all people, playing the Joker. After he died, I had decided I would never see the movie. But after hearing from many people what a wonderful job he did, I finally rented it and watched it last week.

Holy makeup artist, Batman!
There were a lot of times during that movie, that if I didn't KNOW it was Heath, I wouldn't have guessed it. I thought he did a phenomenal job at playing a difficult character - especially in a much darker manner than Jack Nicholson's Joker from the Batman movie.
Certainly, the Oscar was well deserved.

Friday, February 20, 2009

AMR crop, revamped desk

Tonight is the Tropical Crop at AMR - and Nicole is having a scrap space challenge. We need to post pictures of our desks "right now" and then again on Monday showing what it looks like after the hurricane! LOL

So.. here is my desk tonight - I spent a little time this weekend revamping it a little - it's not completely done, and I'm not sure I like it, but we'll find out this weekend as I try to get some of the challenges done.
One of the things I was unhappiest about with my previous set up was that it was hard to get my inks out from where they were. I wanted to get some shelves like AnnCaryl has by her desk, and was lucky enough to find one that was realtively inexpensive. I have my StazOns on one shelf, and Tim's and Nick's inks on another. Also sitting on the TN shelf is my points list for Serendipity's Team Challenge. So far, I love having the inks there - they are much easier to go through. Also, on that shelf, I have 6x6 Basic Grey paper pads, 5.5x8.5 Bazzill packs, some favorite stamp sets, staplers, acrylic blocks, chalk inks, pigment inks, inchie stamps, loose gems (in a tin, not really loose LOL), journaling stuff, sandpaper, and my wire dress form that I have started putting ribbons on. It won't hold all my ribbons by a long shot, but I do like the look, and I like having some ribbons close at hand. I don't like that it is so high up right now, but since the ribbons extend past the base, it needs to be up on some kind of pedestal. But it works for right now. The little white basket holds 3.75x3.75 mat stacks. The ribbon is on a metal thing I picked up at hobby lobby - it looks like a mini paper towel holder, but it is perfect for ribbon. I also have my Big Bite sitting there, for lack of a better place at the moment.
The other thing I didn't like was that it was so easy to set things in front of the drawers with my pens... so now they are in a better place. I bought 2 more each of the 3 and 5 drawer setups, to have it go across most of the desk. I had to actually set them up on a piece of wood (taken from the old wood kitchen shelf I used to have) because I couldn't open the bottom drawers if the paper pad was on the desk. And since I do just about everything on the paper pad.. The package that is on the desk is a RAK I received today from my friend Abby - she rocks! She send me a calendar to put together, flowers, and a really awesome chipboard butterfly album with precut patterned paper pieces. It is really cool! I wish I could get her to make her handwriting into a font... I love her handwriting!
Another new thing above the desk are the wallflowers. When taking down the old cork board, it broke into pieces.. one of the things I liked best about the cork board was being able to pin up my flowers. So I took the small pieces and stuck them on the wall between the new shelf and the spice racks (which I didn't move). Then I stuck the flowers up there.. it's perfect, and I love how it fills up an otherwise useless space.
Spice racks - pretty much unchanged. On top of the drawers, I have my portable mini Ott light, my cast iron hand model with rings, my wire basket with MM and Scrapworks rubons, my Copic markers, the popdots tin, and a shot glass from my friends wedding, which has a couple of stamps in it. Peeking out from behind them is my dymo label maker.

The drawers. The first set has floss/needles, silver and pewter minibrads and jump rings, self adhesive gems (mostly the martha stewart ones I love so much), MM clears letters and shapes, white glitter alphabets, K&Co journal boxes, and the Heidi Swap large flowers (because I have too many and use them too often to put on the cork board!). The next set is full of markers and pens, sorted by type. The third set has colored pencils, stipple brushes and paint dauber tops, hammers, tweezers, piercing tools, rubon tools, dotto refills, liquid adhesives (not including zip dry), pins/charms, regular pens and pencils, and journaling pens. The last set has buttons, date stamps, staples and mini staplers, files/sanders, straight edged and deco scissors, other cutting tools, and some small alphabet stamp sets. So I still have a lot of stuff on the desk within easy reach, but I think some of them will be much more accessible, and it looks a lot neater than the pencil cups did.

To the right of the desk is the metal shelf system, and the small bathroom organizer. The shelf system hold my light, flower jars, specialty ink pads, some alphabet stamp sets, button jars, a couple of punches, and the QK Magnolia dies I love so much. The clear paint can with the ribbon scraps is hanging from the corner, and there are several hand punches stuck on one end. The other one holds my glue dots, x xyron, zip dry, edge distressor, and corner punches. The little green basket with the foam brushes needs a new home. The little blue one is for little scraps.

On Monday I'll get another photo and post again. It will be interesting to see how well the space works for the crop.
Monday, February 16, 2009


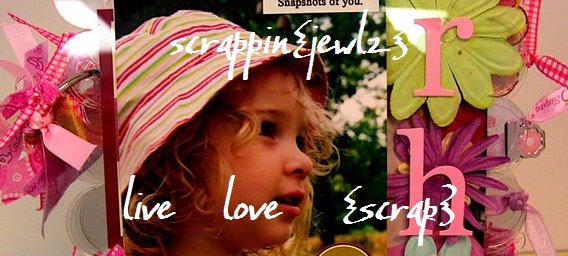
Layout made with some of my favorite photos of my daughter... they were taken during an impromptu photo shoot at Hobby Lobby last November. It was fun to do such detailed work - was sorta following a challenge from a friend (Abby) to use pink on a layout.

Thursday, February 5, 2009

Today we did a photo shoot - a couple of weeks ago, we took Maggie into the pet store, and I came across this lovely little coat - that matched Rhi's fleece top perfectly. So, even though she is a working dog, and will probably never wear clothes again, I wanted to do a photo shoot. Unfortunately, it has been cold the last few weeks, and we didn't have a chance to get outside until today - and Maggie has almost outgrown the coat!
We also have my niece and nephew visiting today, so I have included some pictures of them as well - Kami is such a little diva! And NO Ramsey is not peeing in that picture - he was picking up a pinecone! (a side note - my mom made both the pants and the sweater he is wearing.)


Friday, January 30, 2009

I. Want. These. NOW.

Ok, so y'all know how much I love my Crop-A-Diles. When working with acrylic, there is really NO comparison.

Well check THIS out - this is a new release this CHA from We R Memory Keepers, the fabulous makes of my beloved Crop-A-Diles.


I so cannot wait to my hands on one of these.. I have wanted a corner rounder for the acrylic for quite some time - have not wanted to get the Zutter ones (since I used them at CHA, and they hurt my hand, plus you have to buy two to get both corner sizes!) and haven't been able to get the Paper Gator either (a little pricier than I wanted, and not really something I would use to it's fullest extent). So I am VERY excited to see the Chompers! (And what a great name!).

I do not know how much they will market for - I will find a way to afford them!

Monday, January 26, 2009

Album winner

I haven't been online for a couple of days, so I apologize for not picking the winner sooner.

Random.org picked the winner - out of 23 posts.

Here is your sequence:
14
21
1
17
13
15
7
16
6
12
8
23
20
10
22
18
5
4
9
3
11
2
19
Timestamp: 2009-01-26 19:58:12 UTC


The winning number was 14 - which is Jingle! {dang, girl, go buy some lottery tickets!! LOL)

I'll be submitting both winners to Clear Scraps - they will be sending out the prizes after getting back from CHA. I am sure they are having a GREAT time.. wish I was there!

Wednesday, January 21, 2009

A new president, and my name in print!

I am not one to wax political.. most of my friends know politics are not my thing (especially since if you break it down - poly = many, tics = bloodsuckers).
But even I believe that today great change has come to our country. My kids are homeschooled, and I work in the evenings now, so today we sat and watched the inauguration of Barack Obama, our 44th president. President Obama has a great deal of hard work before him, and I sincerely hope he can live up to expectations. I thought his speech was great.

My kids did not seem to think it was such a big deal - but then they have seen many movies where the President was African American, so I am not sure they realize how far this country has come in the last 60 years, and how big of a deal this is.

No matter what people think of Obama, whether you voted for him or not, today is a huge historical event in this country. Congratulations, Mr. President, and good luck!

Something much less global, but rather important to me, happened today too. Well, not really, but I found it today anyway. After work tonight I stopped in at WalMart to pick up a few things. I was browsing the scrapbook magazines, and I picked up a copy of Scrapbooking and Beyond. Didn't really see that much that made me HAVE to have the magazine, and I was going to put it back... but I came across the book section on the last few pages. Hmn. That book's familiar. Cool, it's the Clear Scraps book! so I read the blurb... and found THIS:

How freaking cool is that?!

Ok, so it isn't one of my projects published in the magazine, but hey, this is the first time my NAME has been published in a national magazine, so I think that's pretty darned cool! Here is a closeup of the text..
So.. yeah.. I had to buy it. And I will probably scrap it. Heck, it'll probably get framed LOL.

Monday, January 19, 2009

happy girl mini album


I made this album using the Abbie's Love Clear N Chips set. I had painted the extra pieces and put them together, but went with different colors, so I will use them on a different project. So for this album I just used the pages, and alternate acrylic with chipboard, keeping the matching pieces together. {Most of the photos were taken before I added the ribbon - I knew the album would lay more flat and even that way - this little album turned out pretty thick - I had to replace the original rings I chose with larger ones!}
The cover is acrylic - and the only thing on it are the Thickers stickers. I do love those glittery letters! {I did use Zip Dry to adhere them for a little adhesive insurance.}

I just left the back of the cover blank, other than that small sticker in the corner. I didn't want to mess up the view from the front by trying to cover up the back.
All of the chipboard pieces were painted with either black {in which I mixed with the pearl Create A Shade paint from Close to My Heart} or Metallic red. Some of the pieces ended up with both colors. The black ones were inked with Tsukineko's Brilliance inks {the silver one} which created an AWESOME effect, and one I intend to repeat again. The red ones were inked with black. I covered one side of each chipboard piece with patterned paper {from the Bohemia line} which was sanded off, inked, and distressed.
I added a paisley rubon {also Bohemia} for background, but it doesn't show up well. Cornered and added the photo, then added the butterfly rubon {Bohemia}, flower stickers, and flower punch {Martha Stewart} . Metal asterisk sticker {Joanne's} and gems {Martha Stewart} finish off the page. {Incidentally... I used about 200 of those gems in this album!}

Left side is journaling - the longest bit in the book. Did it with those tiny Making Memories stickers that everyone has been using - it was a little tedious, but I love the effect. I used a small ink pad to ink over the edges {done after the stickers were placed - I didn't want to ink the one by one!}. Added the swirl rubon, stickers, and gems.
The right side is the heart shaped acrylic piece - Edges were inked with Stazon. Rhine stone swirl is from WalMart {yep, really}. Flower sticker, gem, word sticker, metal sticker. Simple little page, but it helps to accent the photo on the nect page. {I love how it looks like the flower is in her hair}
The back of the acrylic - I recreated the gem flourish with the MS mini gems - thank goodness they are self-adhesive. I have found an easier way to put them on - I used to use tweezers, but it was hard to get the gems off. So I have started using my paper piercer tool. Pick up the gem on the tip, set it where I want it, and hold the gem in place and twist the tool out from under it. It works really well!
For the chipboard heart page, I cut out around the photo, added the embellishment stickers, and added a leaf punch {Martha Stewart} under the flower sticker
Back of the heart page - love that red metallic paint! Cornered the photo and added it, applied the joy rubon {Deja Views}, flower and swirl stickers, leaf punches, and gems.
Acrylic page on the right - Added the rubon frame, flower stickers and gems, and punched the acrylic with my CropADile to add the ribbon. I love this ribbon. I had to go back to the LSS to get some more. {Took me forever to get a bow that nice though... I am bow-challenged!}

Back of the acrylic page - all I did for this one is apply more stickers and gems.
fun page - photo was cornered and applied. Added the flower sticker and leaf punches, fun {Thickers}, and the swirl rubons. {This page really shows the cool effect of the Brilliance ink over the black paint.}

Another simple page - covered with paper, inked and sanded. Penwork around the edge (the dot-dot-dash pattern}. Love stickers, red gems
Butterfly acrylic piece - Has only 2 stickers {the bird and the dimensional LOVE} and a frame rubon from Hambly.

I love this epoxy bird sticker - it makes me think of Jack Sparrow. I was disappointed when I saw it was broken in the package, but I think it's barely visible on the page.
Back of the acrylic - Paper flowers from the Paper Studio, brad from Basic Grey Urban Prairie set {Thanks to Kim, my secret santa from AMR!}, and a metal and epoxy sticker from the dollar store.
Chipboard butterfly page - cornered and applied photo. Added the Cheris sticker tag, flower stickers, and gems. Tied the ribbon onto the tag because it looked bare without it. Added the heart pin - it goes through the foam dot holding the word cherish to the tag. The butterfly punches were made the the Martha Stewart punch out of Wild Asparagus paper. The middle buttfly is actually two punches put together, but the dimension doesn't show well in this photo.

The back of the butterfly chipboard page - Another simple one - an all over photo, rubon letters and sirls, and a gem {for the dot on the i}
Rectangular acrylic page - Epoxy stickers, Basic Grey rubons, flower stickers and a gem. Also, I punched through with the CropADile and added to ribbons to the edge.
Back of the rectangle acrylic - More epoxy tiles, more flower stickers and another gem - essentially the previous page in reverse.
The chipboard page - Added the photo, applied the glittered flower stickers under the epoxy stickers from the previous page. Added the leaf punches, epoxy flower, gem, and rubon letters.
Back of the chipboard piece - cornered the photo. Added the flower stickers underneath where the corners would be before applying the photo. Added epoxy flower stickers on top of that, and applied gems to the center holes in the flowers. The swirl is a rubon. The Giggle piece is a sticker from Making Memories that I inked and put popdot under before applying it. Added another gem to the dot above the i.
The last acrylic piece - when working on these pages, I actually did them at the same time. I love putting frames on the acrylic pieces, but I want them to showcase things on both pages {the Peekaboo Effect}. So I worked a bit with the placement of the Hambly frame and photos until I got it where I wanted it. Added plain flower stickers with 3 dimensional stickers on top, to make up the lower curve of flowers. The upper curve of flowers are just the 3d stickers, with gems added to the 2 smaller ones {the larger ones have bead centers}. Edges of the acrylic piece were inked with StazOn.
repeated the flowers again on the back. Some of the white shows through from the front, but it looks ok, was done on purpose. 3 gems added on this page.
The chipboard piece was inked and sanded. The photo was cornered on one side, then applied to the page. The sweet sticker was inked and raised up with popdots. The chipboard heart came from a set, and the love sticker is from making memories. {it is flocked - love the texture!} Added all the flower stickers and gems to make a frame. {I hate that my daughter looks like a boy in this photo - she had gone behind the barn a month or so before this picture was taken and came out with a matted burr hairdo - and we had to shave it off. I don't know who was more traumatized}.
The back of the album isn't shown, as I have written name, address, and other identifying information for the trip to CHA. But is is a really simple back - painted and inked, with the info written in marker.
I think it took me {not including drying time} about 9 or 10 hours to finish this album, split up into 3 or 4 sittings.
Don't forget to leave a comment on THIS POST for the RAK - comments to today's mini album post will not be included!