


The first technique is one I learned several years ago, from a great CTMH rep, Alona. I have learned a lot of stamping techniques from her. {Check out her website HERE}
Multigenerational stamping is a great way to make a pretty pattern using one stamp and one ink color. {you can use more if you want to, of course}
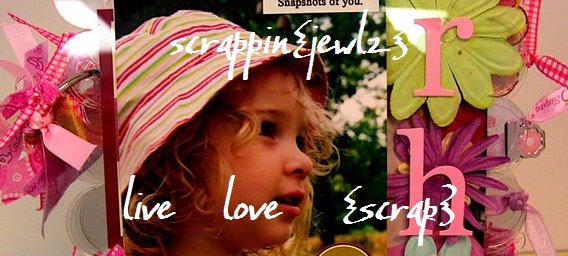
For this demo, I'm using a flower stamp from a great floral set (Brushed Flowers, I think MSE?) and Cranberry Crisp ink from SU!

1. Ink your stamp and stamp the image on your paper.

2. WITHOUT REINKING, stamp the image again, overlapping the images if desired.
Sometimes, depending on the ink, and how fast I am stamping, I will ink 5 or 6 images without reinking. Each image will get progressively lighter.

3. Stamp images until the paper is covered. I did 1st (the darkest), 2nd (the medium pink), and 3rd (the lightest) generation stamping to make this paper. If I want to do 2nd generation stamping, but don't want the 1st generation image on my project, I will stamp off to the side {I have a CTMH paper pad underneath my work, but any scrap paper will do}. Don't forget to stamp off the edge of the paper if you want complete coverage!

4. This is what the completed piece looks like - makes for a very pretty patterned paper, and is a great technique to use if you have limited supplies.

I made this flower by gluing Maya Chipboard petals to the back of my paper, then sanding around the edge instead of cutting {this is a great way to distress the paper and remove the excess in one step!} The petal edges were inked. The center was made by painting first, then adding stickles.

The second technique is called stamp kissing. I don't use it often, but I like the results when I do. It works best if you have a solid stamp, and use it with a patterned or more detailed stamp. For this demo, I used a plain solid circle stamp (CTMH), and a daisy head from the Brushed Flowers set.
1. Ink the patterned stamp (in this case, the daisy).

2. "Kiss" the patterned stamp with the uninked solid stamp {it really is uninked.. LOL It looks purple, but it is acrylic and used rather often}.

3. Stamp the image onto your paper.

4. Voila! This is the result.

You can also do the reverse - ink the solid stamp, then kiss off the ink with another uninked stamp, but I'm not so good at that one ;) All of my samples looked terrible LOL so I'm not posting them.
Hope these techniques will be helpful..


2 comments:
these techniques are great...i don't do much stamping but I think I will be trying these out this weekend!
These are great techniques, and I love the stamps you used for this - perfect choice!!
Post a Comment