


I made this album using the Abbie's Love Clear N Chips set. I had painted the extra pieces and put them together, but went with different colors, so I will use them on a different project. So for this album I just used the pages, and alternate acrylic with chipboard, keeping the matching pieces together. {Most of the photos were taken before I added the ribbon - I knew the album would lay more flat and even that way - this little album turned out pretty thick - I had to replace the original rings I chose with larger ones!}

 The cover is acrylic - and the only thing on it are the Thickers stickers. I do love those glittery letters! {I did use Zip Dry to adhere them for a little adhesive insurance.}
I just left the back of the cover blank, other than that small sticker in the corner. I didn't want to mess up the view from the front by trying to cover up the back.
All of the chipboard pieces were painted with either black {in which I mixed with the pearl Create A Shade paint from Close to My Heart} or Metallic red. Some of the pieces ended up with both colors. The black ones were inked with Tsukineko's Brilliance inks {the silver one} which created an AWESOME effect, and one I intend to repeat again. The red ones were inked with black. I covered one side of each chipboard piece with patterned paper {from the Bohemia line} which was sanded off, inked, and distressed.
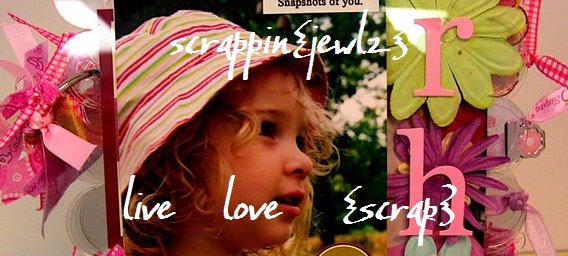
I added a paisley rubon {also Bohemia} for background, but it doesn't show up well. Cornered and added the photo, then added the butterfly rubon {Bohemia}, flower stickers, and flower punch {Martha Stewart} . Metal asterisk sticker {Joanne's} and gems {Martha Stewart} finish off the page. {Incidentally... I used about 200 of those gems in this album!}

Left side is journaling - the longest bit in the book. Did it with those tiny Making Memories stickers that everyone has been using - it was a little tedious, but I love the effect. I used a small ink pad to ink over the edges {done after the stickers were placed - I didn't want to ink the one by one!}. Added the swirl rubon, stickers, and gems.
The right side is the heart shaped acrylic piece - Edges were inked with Stazon. Rhine stone swirl is from WalMart {yep, really}. Flower sticker, gem, word sticker, metal sticker. Simple little page, but it helps to accent the photo on the nect page. {I love how it looks like the flower is in her hair}
 The back of the acrylic - I recreated the gem flourish with the MS mini gems - thank goodness they are self-adhesive. I have found an easier way to put them on - I used to use tweezers, but it was hard to get the gems off. So I have started using my paper piercer tool. Pick up the gem on the tip, set it where I want it, and hold the gem in place and twist the tool out from under it. It works really well!
 The back of the acrylic - I recreated the gem flourish with the MS mini gems - thank goodness they are self-adhesive. I have found an easier way to put them on - I used to use tweezers, but it was hard to get the gems off. So I have started using my paper piercer tool. Pick up the gem on the tip, set it where I want it, and hold the gem in place and twist the tool out from under it. It works really well!
For the chipboard heart page, I cut out around the photo, added the embellishment stickers, and added a leaf punch {Martha Stewart} under the flower sticker
 Back of the heart page - love that red metallic paint! Cornered the photo and added it, applied the joy rubon {Deja Views}, flower and swirl stickers, leaf punches, and gems.
 Back of the heart page - love that red metallic paint! Cornered the photo and added it, applied the joy rubon {Deja Views}, flower and swirl stickers, leaf punches, and gems.
 Acrylic page on the right - Added the rubon frame, flower stickers and gems, and punched the acrylic with my CropADile to add the ribbon. I love this ribbon. I had to go back to the LSS to get some more. {Took me forever to get a bow that nice though... I am bow-challenged!}

 Back of the acrylic page - all I did for this one is apply more stickers and gems.
 Another simple page - covered with paper, inked and sanded. Penwork around the edge (the dot-dot-dash pattern}. Love stickers, red gems
 Back of the acrylic page - all I did for this one is apply more stickers and gems.
 fun page - photo was cornered and applied. Added the flower sticker and leaf punches, fun {Thickers}, and the swirl rubons. {This page really shows the cool effect of the Brilliance ink over the black paint.}
 Another simple page - covered with paper, inked and sanded. Penwork around the edge (the dot-dot-dash pattern}. Love stickers, red gems
Butterfly acrylic piece - Has only 2 stickers {the bird and the dimensional LOVE} and a frame rubon from Hambly.
 I love this epoxy bird sticker - it makes me think of Jack Sparrow. I was disappointed when I saw it was broken in the package, but I think it's barely visible on the page.
 Back of the acrylic - Paper flowers from the Paper Studio, brad from Basic Grey Urban Prairie set {Thanks to Kim, my secret santa from AMR!}, and a metal and epoxy sticker from the dollar store.
 I love this epoxy bird sticker - it makes me think of Jack Sparrow. I was disappointed when I saw it was broken in the package, but I think it's barely visible on the page. Back of the acrylic - Paper flowers from the Paper Studio, brad from Basic Grey Urban Prairie set {Thanks to Kim, my secret santa from AMR!}, and a metal and epoxy sticker from the dollar store.
 Chipboard butterfly page - cornered and applied photo. Added the Cheris sticker tag, flower stickers, and gems. Tied the ribbon onto the tag because it looked bare without it. Added the heart pin - it goes through the foam dot holding the word cherish to the tag. The butterfly punches were made the the Martha Stewart punch out of Wild Asparagus paper. The middle buttfly is actually two punches put together, but the dimension doesn't show well in this photo.


 The back of the butterfly chipboard page - Another simple one - an all over photo, rubon letters and sirls, and a gem {for the dot on the i}
 Back of the rectangle acrylic - More epoxy tiles, more flower stickers and another gem - essentially the previous page in reverse.
 The back of the butterfly chipboard page - Another simple one - an all over photo, rubon letters and sirls, and a gem {for the dot on the i}
Rectangular acrylic page - Epoxy stickers, Basic Grey rubons, flower stickers and a gem. Also, I punched through with the CropADile and added to ribbons to the edge.
 Back of the rectangle acrylic - More epoxy tiles, more flower stickers and another gem - essentially the previous page in reverse.
 The chipboard page - Added the photo, applied the glittered flower stickers under the epoxy stickers from the previous page. Added the leaf punches, epoxy flower, gem, and rubon letters.
 Back of the chipboard piece - cornered the photo. Added the flower stickers underneath where the corners would be before applying the photo. Added epoxy flower stickers on top of that, and applied gems to the center holes in the flowers. The swirl is a rubon. The Giggle piece is a sticker from Making Memories that I inked and put popdot under before applying it. Added another gem to the dot above the i.
 Back of the chipboard piece - cornered the photo. Added the flower stickers underneath where the corners would be before applying the photo. Added epoxy flower stickers on top of that, and applied gems to the center holes in the flowers. The swirl is a rubon. The Giggle piece is a sticker from Making Memories that I inked and put popdot under before applying it. Added another gem to the dot above the i.
 The last acrylic piece - when working on these pages, I actually did them at the same time. I love putting frames on the acrylic pieces, but I want them to showcase things on both pages {the Peekaboo Effect}. So I worked a bit with the placement of the Hambly frame and photos until I got it where I wanted it. Added plain flower stickers with 3 dimensional stickers on top, to make up the lower curve of flowers. The upper curve of flowers are just the 3d stickers, with gems added to the 2 smaller ones {the larger ones have bead centers}. Edges of the acrylic piece were inked with StazOn.

 repeated the flowers again on the back. Some of the white shows through from the front, but it looks ok, was done on purpose. 3 gems added on this page.
repeated the flowers again on the back. Some of the white shows through from the front, but it looks ok, was done on purpose. 3 gems added on this page. The chipboard piece was inked and sanded. The photo was cornered on one side, then applied to the page. The sweet sticker was inked and raised up with popdots. The chipboard heart came from a set, and the love sticker is from making memories. {it is flocked - love the texture!} Added all the flower stickers and gems to make a frame. {I hate that my daughter looks like a boy in this photo - she had gone behind the barn a month or so before this picture was taken and came out with a matted burr hairdo - and we had to shave it off. I don't know who was more traumatized}.
 The back of the album isn't shown, as I have written name, address, and other identifying information for the trip to CHA. But is is a really simple back - painted and inked, with the info written in marker.
 The back of the album isn't shown, as I have written name, address, and other identifying information for the trip to CHA. But is is a really simple back - painted and inked, with the info written in marker.
 I think it took me {not including drying time} about 9 or 10 hours to finish this album, split up into 3 or 4 sittings.
Don't forget to leave a comment on THIS POST for the RAK - comments to today's mini album post will not be included!


14 comments:
Gorgeous Julie, you always make such awesome mini's!!
Beautiful work
Julie, that is awesome - so small and yet full of big surprises!
stunning album! Thanks for the ideas here! I have never worked with these products but I just got this same kit in the mail today!
Very cute book Julie!!!! I have yet to venture into an acrylic album......but they are so darned cute! Great work and thanks for sharing!
Wow, that is just awesome! I love how you did all the frames.
I so love your mini album. Your work just amazes me so such with all the detail you put into them.
grettasgranddaughter
amazing album!!! way to go, just love what you created
It's just as gorgeous as I'd imagined! Awesome job, Julie! Love all the flowers and the pink! :)
It is awesome!!!
awesome as always jen! beautiful work!
Love it! That is so cute, esp. the bird on that flower!!
absolutely gorgeous julie!!
oh this is pure gorgeousness!!! I'm drooling over every page! Great job!
Post a Comment